User Guide: Jaksta Media Recorder for Windows (v4)
User Guide: Jaksta Media Recorder for Windows (v4)
RECORDING AVAILABLE MEDIA STREAMS

- Click the Start Monitoring button.
- If you wish to automatically convert the downloaded stream into a format suitable for your portable media center then select the appropriate settings from the Conversion Settings drop download list. If you do not wish to convert the downloaded stream select Do not convert from the drop-down.
- Navigate your web browser to the web page streaming the media you wish to record. It is important that you are recording before the stream starts playing in the browser. If a stream has already started or is not detected by Jaksta Streaming Media Recorder by the time it starts playing click your browsers reload button to start the stream again. If Jaksta Streaming Media Recorder still doesn’t capture it clear your browsers cache as it may have been cached.
- Compatible streams include:
Streamed via HTTP download on port 80- FLV
- WMA
- WMV
- ICECAST
- WMX
- Real Audio
- Real Video
- ASF
- MP3
- MP4
- 3GP
- MOV
- AVI
- DIVX
Streamed via RTMP on ports 1935 and 443- FLV
- MP4
- FLV
- MP4
Streamed via RTSP on port 554- ASF
- MP3
- WMA
- WMV
- MOV
Some websites stream media on non standard ports. See the notes below- If the stream is compatible, then Jaksta Streaming Media Recorder will detect the stream and queue it for downloading. Once this has occurred, you can continue surfing – There is no reason to play the entire stream in the browser.
- Jaksta Streaming Media Recorder will automatically try and determine a useful name from the stream and name the file accordingly, however you can rename the file using the Stream > Rename menu items.
- To stop recording click the Stop Monitoring button. Streams currently being downloaded will still be processed. No new streams will be added.
CONVERTING YOUR RECORDINGS TO OTHER FORMATS
Jaksta Streaming Media Recorder can automatically convert captured media files to other formats. Under Conversion Settings on the main screen, just choose the final format for your recorded files. Once a file has been captured, the conversion process begins automatically.
You can also convert a file after it has been captured. Here’s how:
- Change the output format in the Conversion Settings list.
- Right-click the file to make the options menu appear:
- Select Convert from the pop-up menu.
Want to convert a file that may no longer be in the recordings list? That’s easy too. Just drag and drop the file from Windows Explorer directly into the Jaksta Streaming Media Recorder window and the selected conversion will run on that file. You’ll find the converted file in your converted files folder.
Note: You can create your own custom conversions using the Conversions Settings option from the Tools menu.
MODIFYING CONVERSION PRESETS
Jaksta Streaming Media Recorder uses FFMPEG for conversions. The Conversion Settings dialog provides a way to set the command line parameters.
More information on these parameters can be found in the FFMPEG documentation.
- Output format corresponds to -f
- Start Time Offset corresponds to -ss
- Disable Video corresponds to -vn
- Video codec corresponds to -vcodec
- video or ame Rate corresponds to -r
- Video Bit Rate corresponds to -b
- video or ame Size corresponds to -s
- Audio Codec corresponds to -acodec
- Audio Bit Rate corresponds to -ar
- Audio Channels corresponds to -ac
- Audio Sample rate corresponds to -ar
- Audio Volume corresponds to -vol (256 is normal)
Further Instructions
- To adjust or create new conversion setting presets please open the Conversion Settings dialog from the Tools > Conversion Settings menu item.
- To adjust an existing preset select it from the drop down list, adjust the value and click the Save button.
- To create a new preset, select a preset that is similar to the one you want to create from the drop downlist and click the Clone button. Enter a new name for the preset in the New Preset dialog and click OK. Adjust the settings as required and click the Save button.
- To reset all presets back to the system defaults click the System Defaults button.
RECORDING FROM BEHIND A PROXY SERVER
If your computer is behind a proxy server, please add the proxy servers port to the Ports to Monitor on the Settings dialog which is accessed via the Tools > Settings menu.
SCHEDULING DOWNLOADS
Jaksta Streaming Media Recorder supports scheduling the recording of streaming media. This can be useful for recording long streams during periods of inactivity or regularly streamed programs such as radio shows or live events.
Streaming media can be scheduled for recording either once off or on a regular repeat basis.
In either case Jaksta Streaming Media Recorder must be running at the scheduled time, an internet connection must be present and the streaming media must play automatically without user intervention when the hosting web page is viewed.
To schedule a stream for recording:
- Select the Schedule node to display the Schedule list.
- Click the Add button to display the Schedule dialog.
- Navigate your web browser to the web page containing the streaming media you would like to record at a schedule time. Ensure the streaming media starts to play automatically. Select and copy the URL (Address) of the web page.
- Past the copied URL (Address) into the URL that hosts the streaming media text box on the Schedule dialog.
- Select the schedule Type and fill out the Start data and time and if necessary the days of the week recording is to occur.
- Click OK to save the schedule.
Provided Jaksta Streaming Media Recorder is running and there is an internet connection, Jaksta Streaming Media Recorder will automatically launch scheduled web pages at the required time and begin to record the stream.
Please note that if your machine is unattended and the browser is not closed then both Jaksta Streaming Media Recorder and your browser will download the stream resulting in twice the amount of bandwidth being used.
FIX FLV TOOL
Jaksta Streaming Media Recorder’s Fix FLV tool allows you to fix duration meta data and timestamps in FLV files.
Sometimes when recording web-cams the site does not provide meta data. In particular the duration in the meta data is important in FLV files because it allows you to search forward in the FLV file in many players. Without it you can not rapidly seek forward in the file.
Sometimes a recorded web-cams video and audio may also be out of sync because the server is sending incorrect timestamps
To fix a downloaded/recorded FLV file:
- Select the recorded/downloaded entry and then Download > Fix FLV menu item to display the Fix FLV dialog. Depending upon the size of the file it may take sometime to finish loading as it analyzes the file.
- The Meta Data section displays the file name and the actual duration of video/audio packets within the file. It also displays the current meta data within the file. If the duration in the meta data is different to the actual file duration or there is no meta data click the Fix Duration button.
- Expand the File Contents section to view all audio and video packets within the file and their associated timestamps. If the audio and video is out of sync click the Fix Time button which will reset the interval between each packet to the number specified. 15 is the default.
- To delete packets within the file select them and click the Delete button.
To fix an existing FLV file from your file system select the Tools > Fix FLV menu item.
USING THE AUDIO RECORDER
The Audio Recorder lets you save audio as it plays through your PC’s speakers. You would use this if Jaksta Streaming Media Recorder is unable to record audio from a particual web site due to encruption, or if you’d like to record audio from any program playing on your PC.
Here’s how to use the Audio Recorder:
- Click Audio Recorder from the left side of the Jaksta Streaming Media Recorderr window. The Audio Recorder appear.
- Enable Split on Silence if you’re recording music tracks and would like Jaksta Streaming Media Recorder to create individual tracks as it detects silence. If tracks are not splitting properly, adjust the threshold.
- If you’re using Vista or Windows 7, you’ll have two different audio recorder options. Choose Windows Audio Driver to record everything you hear on your PC (which may include alerts or other background noises). Choose Applian Audio Driver to record just the sounds from each player or your browser. (If you have Windows XP, you won’t have this option.)
- Click Start to begin recording. As you record, you’ll see activity as sound is detected by Jaksta Streaming Media Recorder:
- Click Stop to end your audio recording session. The recorded audio file appears in your recordings list.
USING THE CACHE BROWSER
In most cases when you play a video in your browser, the browser saves a copy in its temporary cache so that it will load more quickly next time you’d like to play it. Jaksta Streaming Media Recorder can view this cache and allow you to extract videos from it. Here’s how:
- Click Cache Browser from the left-hand side of your Jaksta Streaming Media Recorder window. The Cache Browser appears:
- You can select to view either your Firefox cache, or your Internet Explorer cache (Chrome is coming soon). If you select Firefox, you’ll be prompted to close Firefox in order to view its cache.
- Click the refresh button and all videos that are currently in the browser cache will be listed.
- To save a video, highlight it in the list then select the Extract button. You’ll be prompted to select a location to save the video.
USING THIRD-PARTY PLUGINS
Jaksta Streaming Media Recorder supports adding third party plug-ins like rtmpdump to handle the downloading of streams. If Jaksta Streaming Media Recorder can not download or record a file, installing a plugin will give it extended power.
To add a plug-in go to the Plug-ins tab on the Settings dialog which can be opened via the Tools > Settings menu.
- Click the add button to bring up the External Program dialog.
- Select the protocol you would like to pass to the plug-in
- Enter part of the URL to match
- Enter the plug-ins executable name and place the executable in the Jaksta Streaming Media Recorder installation folder
- Enter the executables parameters. Use the patterns url and file as indicated on the dialog. Other parameters should be hard coded.
- Click OK to save
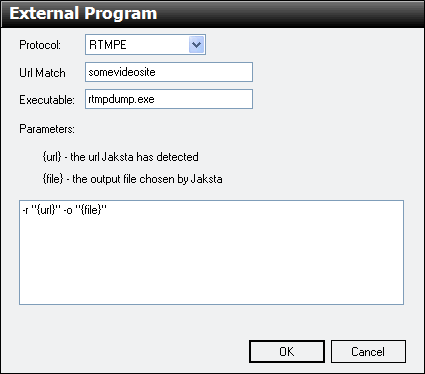
The above example adds a plug-in called "rtmpdump" to record RTMPE requests from somevideosite.com
Legal Note: Jaksta Streaming Media Recorder does not support recording of copy protected content. The plug-in option is made available for technically oriented customers, but we cannot support or answer questions on using software from other individuals or companies.
A plugin is a windows command line executable that takes a url and output file as command line parameters. Of course it can take other parameters as well but Jaksta Streaming Media Recorder will populate the URL and output files. The plugin should display its download progress to stdout and error output to stderr. Both pipes should be flushed each time something is written to ensure they appear promptly in the Jaksta Streaming Media Recorder interface. It should also return true or false on exit as to whether the download was successful or not so that Jaksta Streaming Media Recorder can display the correct final status.